Working eCheck Disputes
ACH transactions grant consumers the ACH Right of Return wherein the customer has 60 days to challenge an ACH transaction with his or her bank and have the funds returned via an ACH Return Entry. A RDFI A Receiving Depository Financial Institution is a financial institution qualified to receive Automated Clearing House (ACH) entries. RDFIs must abide by the National Automated Clearing House (NACHA) rules. can initiate a return for a number of reasons, which can range from insufficient funds to fraud. The only recourse merchants have at that point is collections, a notice from an attorney, or a lawsuit in court—all remedies that cost money. NOTE: Forte's Direct Recovery collects the funds from NSF returns (R01 - Insufficient Funds) using proprietary smart re-presentment technology. For more information, click here.
However, after those 60 calendar days, RDFIs cannot initiate a return without first asking for Proof of Authorization (POA) from the merchant. A POA request gives merchants the ability to prove that the customer's authorization was properly executed and obtained and that the transaction was valid.
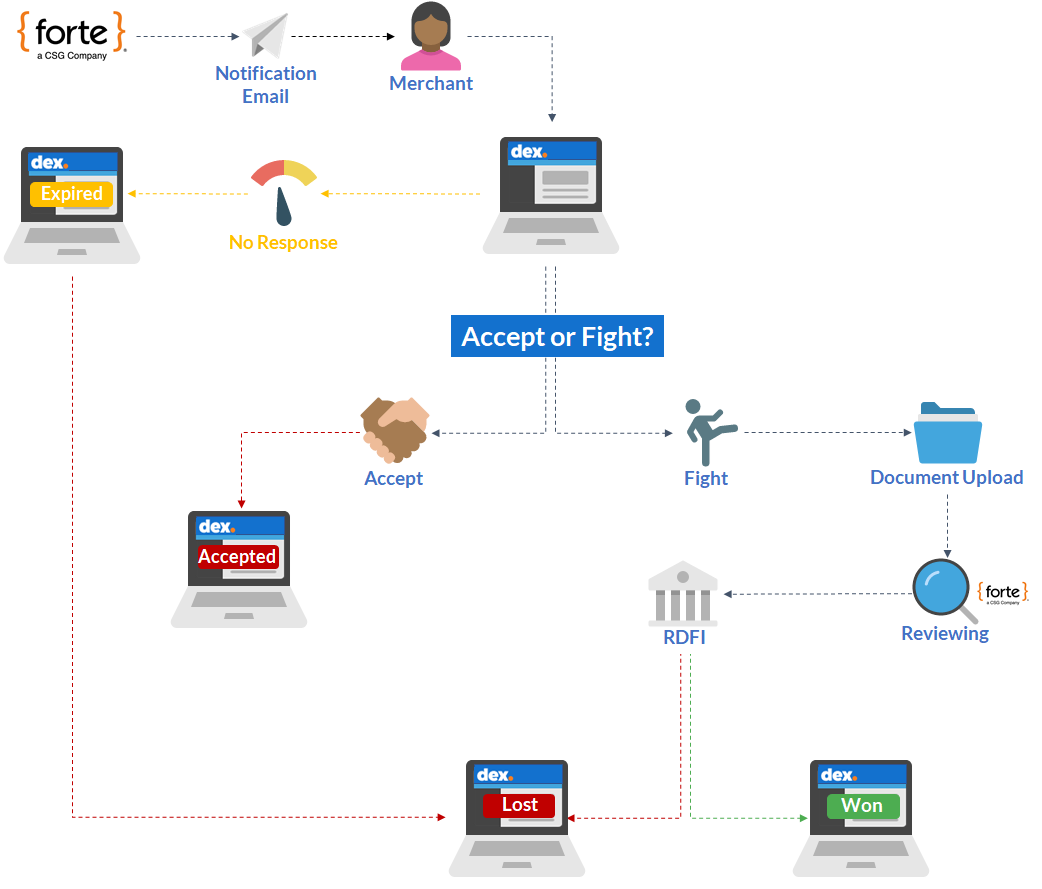
To avoid lost revenue, additional processing fees, funding holds, and even termination, merchants should always respond to echeck disputes. Like credit card disputes, echeck disputes follow a similar dispute lifecycle in Dex. However, echeck disputes are due 5 days after the notification email and only result in funding adjustments if/when the RDFI initiates an ACH return, which can occur if the merchant does not respond within the allotted time or the RDFI deems the provided evidence insufficient. As a rule, always respond by either accepting or submitting your documentation.
Before You Begin
All dispute documentation is transmitted digitally. Depending on your integration and business practices, you may need a scanner or an online fax service that can create digital copies of documents like signed receipts, acknowledged Terms of Service agreements, business contracts, etc. Dex also supports .mp3 and .wav recordings of your customer's verbal authorization for transactions captured via telephone. The type of document(s)/file(s) you will need depend on the standard entry class (SEC) code of the transaction. But don't worry—Dex will provide you with both the dispute reason and the documentation you'll need to support your side.
Step 1: Find the Dispute in Dex
The notification email you receive when a customer submits a dispute will include all the information you'll need to find the dispute record in Dex.
To view a specific dispute without having to filter through a long list, enter one of the following values in the search bar:
- Customer Name
- Dispute Number
Dex auto-populates the list of results. If you do not have these specific values or you want to view disputes with specific attributes, apply the following filters:
| Filter | Description |
|---|---|
| Received Date |
The Received Date of the dispute. Use the date picker in both the Start Date and End Date fields to customize the date range of your listed disputes. If a date range is not provided, the End Date defaults to today's date and the Start Date defaults to yesterday. You can also choose one of the following pre-defined dates/date ranges:
This field saves the last date filter option so that you don't have to put the same option in every time you search for disputes. |
| Status |
The current status of the dispute. Supported options include the following:
|
| Location ID | The ID of the merchant location that processed the transaction. |
| Amount | The amount of the dispute. This field can be a specific value (e.g., 9.76) or a range of values separated by a hyphen (e.g., 5-10). |
| Record Type |
Indicates the type of dispute that the customer's bank initiated. To view only echeck disputes, select Proof of Authorization. |
Step 2: Gather Evidence
Once you find the dispute and access its Details Screen, you can view the dispute's Due Date, Original Transaction, and the Items Needed for evidence to support your side in the dispute.
To view the original disputed transaction, click the View link under the Original Transaction field of the General Information card. Dex takes you to the Transaction's Detail Screen, where you can view the Authorization and Settlement data associated with the transaction as well as a digital receipt of the transaction. Click the Dispute Status box on the Transaction's Details screen to return to the Dispute's Details Screen.
To view the documents required to prove the original transaction was properly authorized, select the Items Needed tab and read the description of the required documentation. The type of supporting documentation will depend on the SEC code of the original transaction, but Dex will display a specific list of evidence item(s) that will help you win your case. For reference, the following items are required for the following codes:
| SEC Code | Authorization Documentation |
|---|---|
| TEL | An audio recording of the customer's verbal authorization. If the merchant did not make an audio recording, he or she must submit a copy of the followup letter mailed to the customer, which lists the authorization information according to the phone conversation. |
| PPD | A copy of the written authorization that the customer signed. |
| WEB | A copy of the internet authorization as seen by the customer plus the date, timestamp, and user IP address used to transmit the authorization. |
| POP |
A copy of the receipt containing the following information:
|
| CCD | A copy of the written business contract that the customer signed. |
| RCK | A copy of the front and back of the check and a copy of the notice to consumers that all checks are converted to ACH entries. |
Step 3: Upload Your Evidence to Dex
Once you've collected all your evidence, you will need to create digital copies of paper documents, ensure recorded authorizations are in .mp3 or .wav files, and upload everything into Dex from either the Disputes Datagrid or the Dispute's Details Screen. Dispute documents/recordings must be 8MB or smaller and can be in one of the following formats:
- bmp
- jpeg/jpg
- mp3
- png
- tiff
- txt
- wav
If you have multiple pieces of evidence you can upload them as separate files or combine them into a larger, composite document—as long as that document is under 8MB.
Uploading Documents
To upload your documentation from the Disputes Datagrid, complete the following steps:
- Search for the dispute by Customer Name or Dispute Number and/or use the available filters to narrow down the displayed list of disputes.
- When you find the dispute, click
 > Upload Attachment next to the dispute's listing. The Upload Dispute Attachments Modal displays.
 - Drag and drop the file(s) into the "Uploads" box or click the Browse button to open a File Explorer Window from your computer. Select the item(s) you want to upload and click the Open button.
- After adding the desired file(s) to the Upload Dispute Attachment Modal, use the dropdown menu to select the privacy setting for each document. Supported options include the following:
- Visible to Forte Only
- Visible to Merchant and Forte
- Visible to All
- Click the Upload button on the Upload Dispute Attachments Modal. Dex displays a message indicating whether or not the upload was successful.
To upload your documentation from the Dispute's Details Screen, complete the following steps:
- Search for the dispute by Customer Name or Dispute Number and/or use the available filters to narrow down the displayed list of disputes.
- When you find the dispute, click the row on which it's listed. The Dispute's Details Screen displays.
- If not already selected, click the Items Needed tab.
- Drag and drop the file(s) into the "Uploads" box under the Items Needed tab or click the Browse button to open a File Explorer Window from your computer. Select the item(s) you want to upload and click the Open button. The Upload Files Modal displays.
- Use the dropdown menu that displays next to the file name on the Upload Files Modal and select the privacy settings for this document. Supported options include the following:
- Visible to Forte Only
- Visible to Merchant and Forte (default)
- Visible to All
- Your file(s) begins uploading into Dex beneath the "Total Uploads" section of the Items Needed tab. To view a thumbnail image of the file, click the Refresh button.
Working with Uploaded Documents
After uploading a document, you can view and download it from the Dispute's Details Screen. To perform these actions, complete the following steps:
- If not already selected, click the Items Needed tab.
- Find the desired file and then
- Click
 to view the file in a web browser window. NOTE: Pop-ups must be enabled for Dex sites in your browser to view an attachment.
 - Click
 to download a local version of the file to your computer.
- Click
Step 4: Submit Your Documents for Review
After uploading the required supporting documentation for a dispute, you can submit comments and the evidence back to Forte for review and approval.
Commenting on a Dispute
Merchants, Partners, and Forte employees can all add comments to a dispute record. These comments can be classified in one of three different categories/view levels:
| Category | Description |
|---|---|

|
Public comments are visible to every user who has access to this dispute record. Merchants can only post Public comments. |

|
Partner comments are visible to partner and Forte corporate users who have access to this dispute record. Merchants cannot see or respond to partner comments. |

|
Forte comments are only visible to members of Forte's Risk Team. Neither merchant nor partner users can see or respond to Forte comments. |
Adding a Comment to a Dispute Record
To add a comment to a dispute record, complete the following steps:
- Access the Dispute's Detail Screen and click the Comments tab.
- Enter your 500-character or less comment in the free-text field.
- Use the View Level dropdown to select the comment category. Merchants can only make Public comments and Partners can make either Public or Partner comments.
- Click the Post button. Dex displays the comment along with your name, date and time when you added the comment, and the view level of the comment.
Replying to a Comment in a Dispute Record
The view level of all comment replies must match the original comment view level (i.e., users can only make Public replies to Public comments). To reply to a comment in a dispute record, complete the following steps:
- Access the Dispute's Detail Screen and click the Comments tab.
- Find the comment you want to reply to and click the Reply button. A free-text field displays.
- Enter your 500-character or less reply comment in the free-text field.
- Click the Add button. Dex adds the reply to the comment. Click the Show link to view the reply nested beneath the original comments.
Submitting Documents
Your supporting documentation must be submitted on or prior to the dispute due date. To submit a dispute for review, complete the following steps:
- Search for the dispute by Customer Name or Dispute Number and/or use the available filters to narrow down the displayed list of disputes on the Disputes Datagrid.
- Access the Submit for Review Modal using one of two methods:
- From the Disputes Datagrid, click > Submit for Review next to the dispute's listing.
- Access the Dispute's Details Screen and click Actions > Submit for Review.
- From the Disputes Datagrid, click
- To confirm your submission, click the Submit button on the Submit for Review Modal. Dex returns you to the previous screen and changes the status of the dispute to Reviewing.
After Submission
After submitting your documents, Forte will review them to make sure they're relevant, concise, and present a compelling case. If we think you need more evidence, we'll contact you and place your dispute back into the Documents Needed status. You will need to repeat the steps listed above to submit additional documents.
If approved, your documents will be transmitted to the RDFI for review and your dispute will go into Pending status. The amount of time before a decision is rendered depends on the bank that requested the POA. You can track the progress of your dispute on the History tab of Dispute's Details Screen. This tab provides a dated and timestamped record of dispute events like status changes. If the RDFI ever initiates an ACH return on the transaction at any time during the dispute process or if the merchant fails to respond to an echeck dispute, Forte automatically places the dispute into Lost status. If an echeck dispute stays in Pending status for 61 consecutive days, Forte moves the dispute into Won status. Forte does not perform funding adjustments on echeck disputes; rather, the RDFI collects funds via ACH return for lost disputes.